From the archive
HoloLens Tutorial – Hologram Management
Last Updated: Apr 29, 2017
Tutorial Accomplishments- Create a Manager that knows about all the Holograms to instantiate
- Update the Object Placer to instantiate Holograms based on the Manager
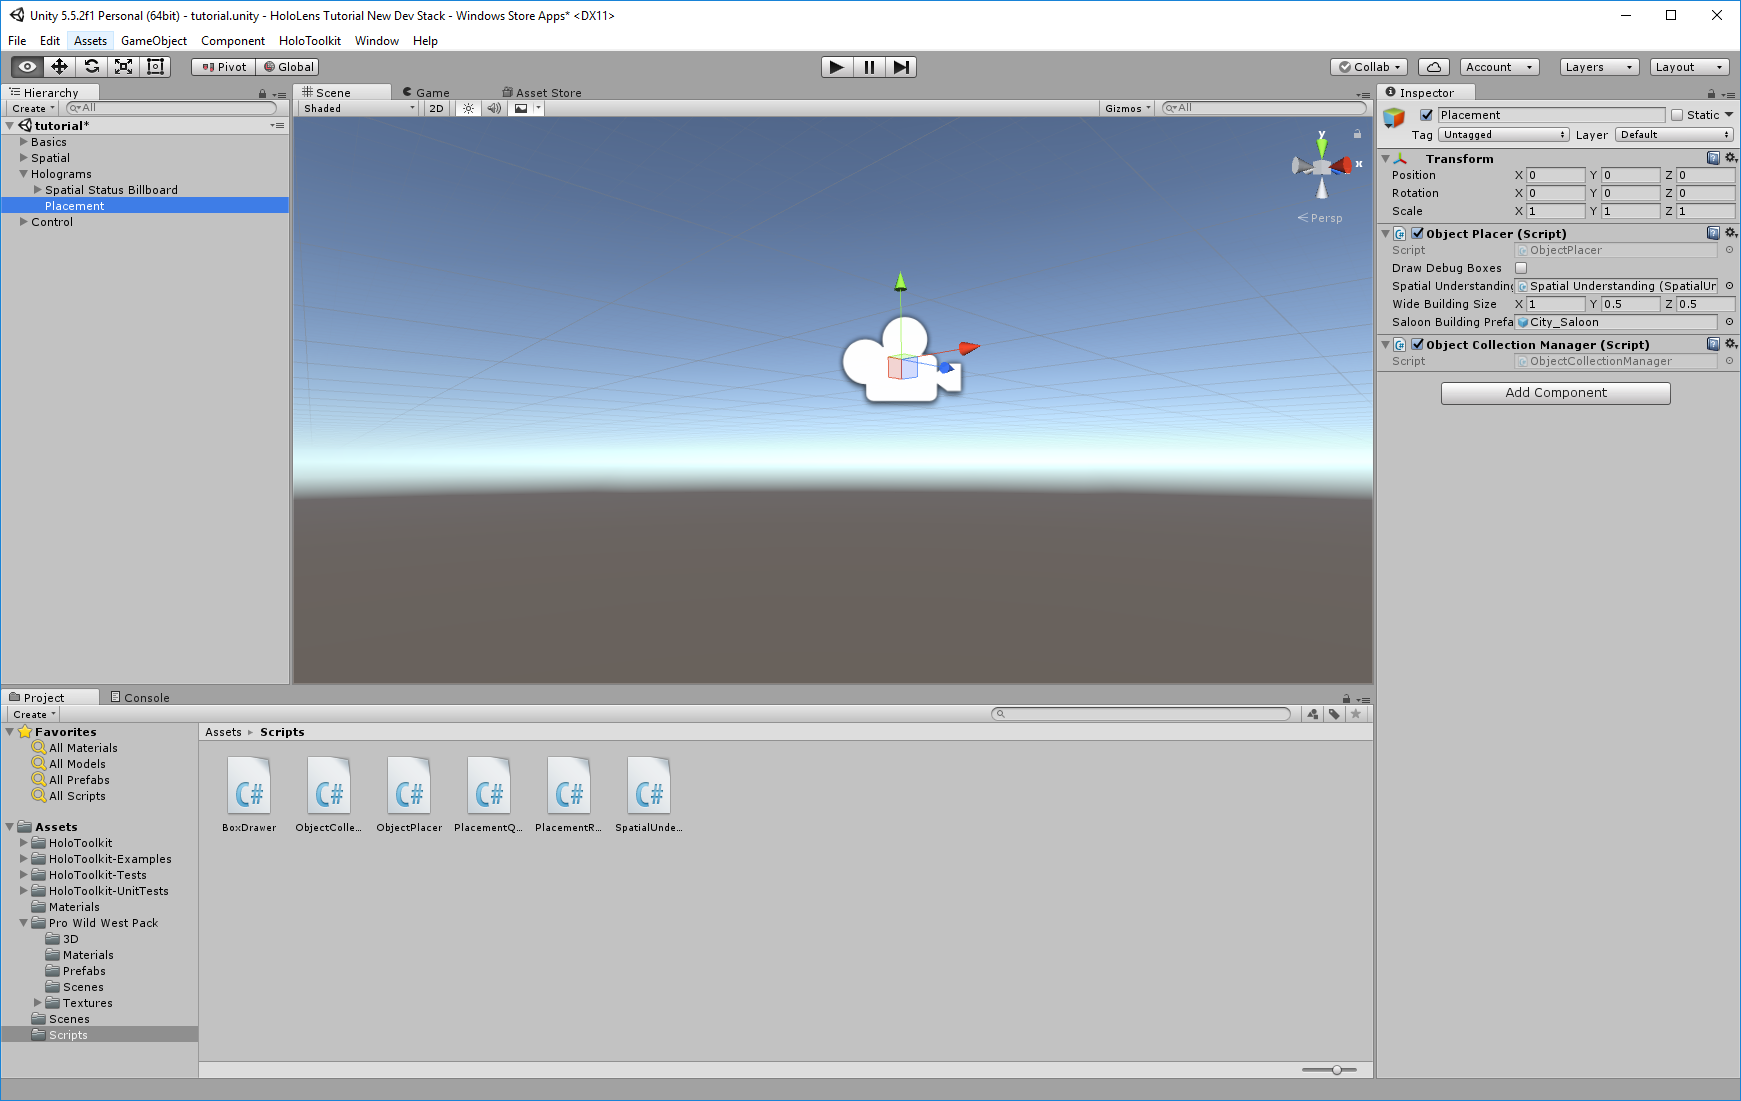 Open the script in Visual Studio. Add the following code to the ObjectCollectionManager.cs:
https://gist.github.com/CameronVetter/7932386e622f2fe6047632806235b99f
We start by establishing a few properties that are used to manage the desired size of buildings and a place to hold all the models. The ScaleFactor is used to track (or force) the scaling that will happen to the holograms. Finally, the ActiveHolograms list is used to track all the holograms after they are instantiated, this makes it easy to add other scripts that manipulate the holograms after they are instantiated.
We add the CreateWideBuilding method which is a refactored version of the same method from the previous tutorial. This method calls CreateBuilding with parameters telling the method how to instantiate the building. The only difference from the last tutorial is that we add the instantiated gameobject to the ActiveHolograms list. We also replaced the call to RescaleDesiredSizeProportional with a call to the helper RescaleToSameScaleFactor. The reason for this change is that we need all the holograms to get the same scale factor applied to them so that they all look the same size relative to one another.
The new RescaleToSameScaleFactor is made of a series of utility functions that looks at every hologram in the manager and calculates the largest scale factor that would allow every hologram to fit within the bounding box that is established by WideBuildingSize. Once this is calculated it is reused in every future call and does not need to be recalculated.
Switch back to Unity 3D. The object collection manager now has some properties, we need to populate. Use the following settings:
Open the script in Visual Studio. Add the following code to the ObjectCollectionManager.cs:
https://gist.github.com/CameronVetter/7932386e622f2fe6047632806235b99f
We start by establishing a few properties that are used to manage the desired size of buildings and a place to hold all the models. The ScaleFactor is used to track (or force) the scaling that will happen to the holograms. Finally, the ActiveHolograms list is used to track all the holograms after they are instantiated, this makes it easy to add other scripts that manipulate the holograms after they are instantiated.
We add the CreateWideBuilding method which is a refactored version of the same method from the previous tutorial. This method calls CreateBuilding with parameters telling the method how to instantiate the building. The only difference from the last tutorial is that we add the instantiated gameobject to the ActiveHolograms list. We also replaced the call to RescaleDesiredSizeProportional with a call to the helper RescaleToSameScaleFactor. The reason for this change is that we need all the holograms to get the same scale factor applied to them so that they all look the same size relative to one another.
The new RescaleToSameScaleFactor is made of a series of utility functions that looks at every hologram in the manager and calculates the largest scale factor that would allow every hologram to fit within the bounding box that is established by WideBuildingSize. Once this is calculated it is reused in every future call and does not need to be recalculated.
Switch back to Unity 3D. The object collection manager now has some properties, we need to populate. Use the following settings:
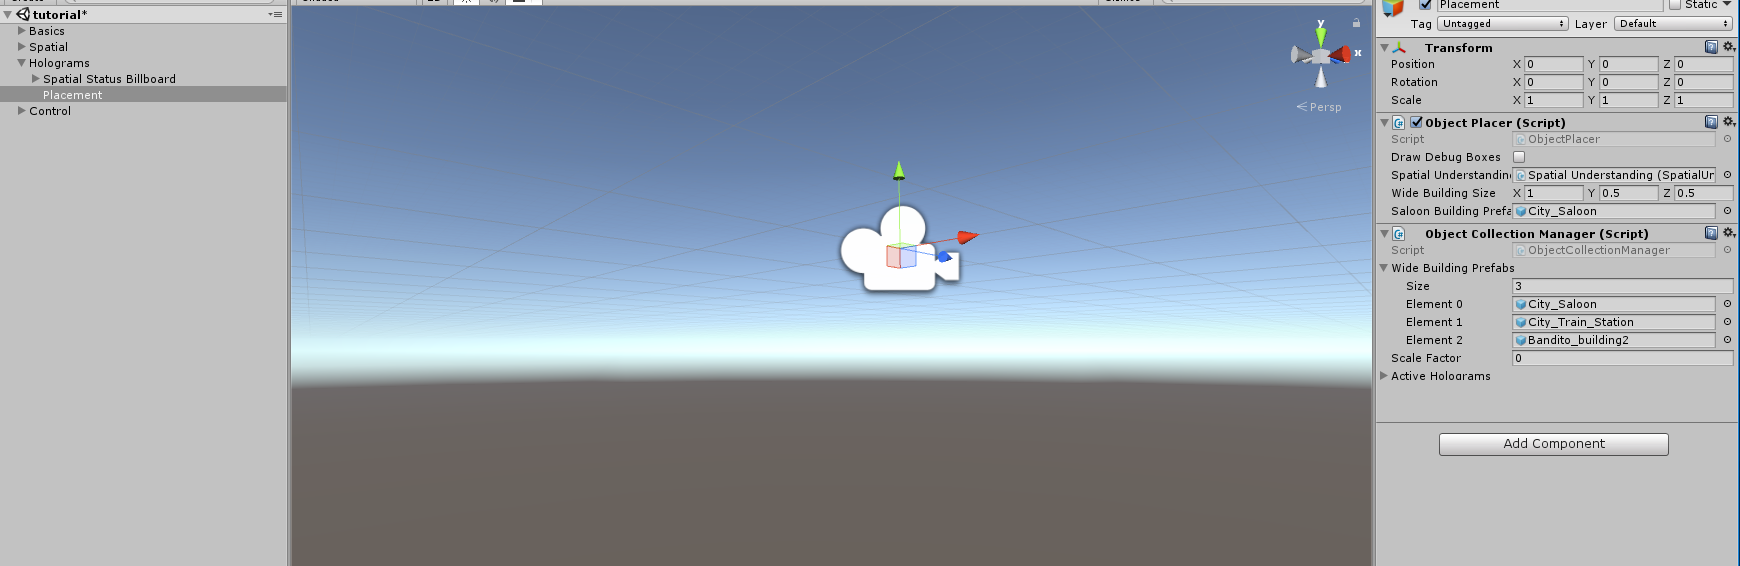 The Object Collection Manager is now configured to display three different buildings, scaled to fit within a bounding box of 1 x 0.5 x 0.5 meters.
Some of the functionality of the Object Placer Script has moved into the Object Collection Manager. Next we will update Object Placer to remove that redundant functionality. Open ObjectPlacer.cs in Visual Studio. Edit the Contents to:
https://gist.github.com/CameronVetter/3772d0be744d2d528cbff3e30c79ff10
These changes will remove some of the properties in Unity 3D. Switch back to Unity 3D. Verify that your Placement GameObject properties match these:
The Object Collection Manager is now configured to display three different buildings, scaled to fit within a bounding box of 1 x 0.5 x 0.5 meters.
Some of the functionality of the Object Placer Script has moved into the Object Collection Manager. Next we will update Object Placer to remove that redundant functionality. Open ObjectPlacer.cs in Visual Studio. Edit the Contents to:
https://gist.github.com/CameronVetter/3772d0be744d2d528cbff3e30c79ff10
These changes will remove some of the properties in Unity 3D. Switch back to Unity 3D. Verify that your Placement GameObject properties match these:
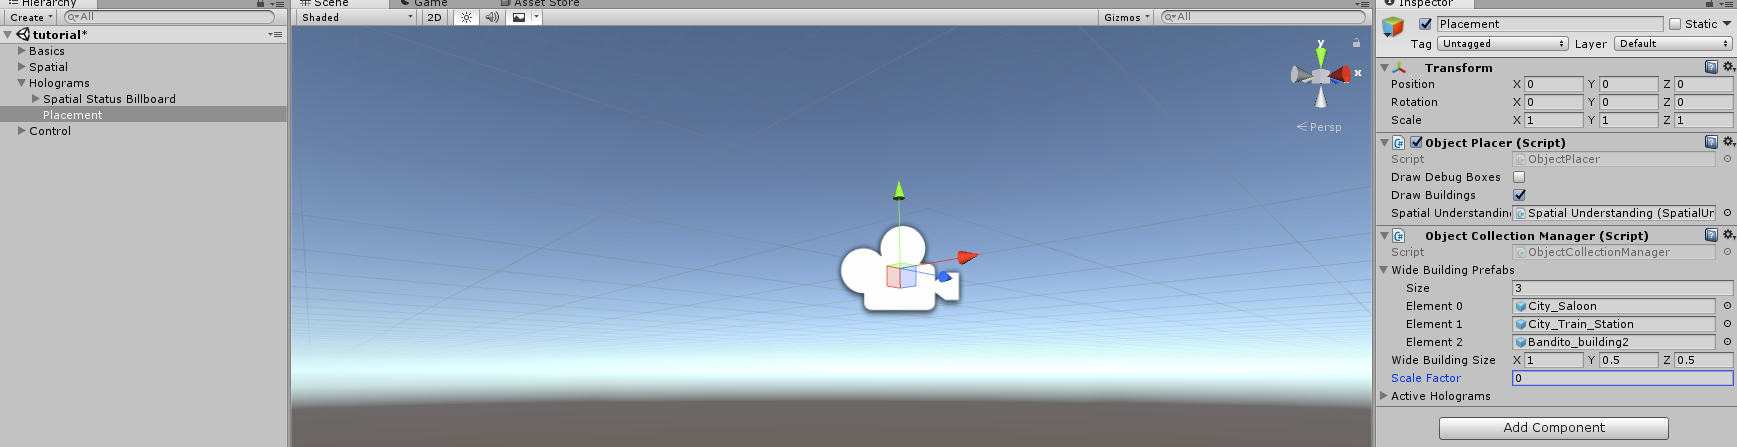 Build and Deploy to your device. Make sure you map a lot of floor space, and you should now see three buildings. Notice that if you map a small amount of floor space the ObjectPlacer handles it gracefully and only displays as many holograms that it can fit in the available floor space.
Add other Types of Holograms
Next we will extend this to generate many different types of buildings, and create an entire town. Update ObjectCollectionManager.cs with these changes:
https://gist.github.com/CameronVetter/186680084516374dce8edd1659f778e9
These changes add properties to allow you to specify other types of building and trees. These work just like the methods we created earlier to create wide buildings.
Modify ObjectPlacer.cs to contain these contents:
https://gist.github.com/CameronVetter/575d91e6df99fe312296866a703b86b5
These changes add an extra property that is used to tell the ObjectPlacer whether or not to draw the trees. We also added some logic to find locations for these trees. Notice that in the CreateScene method we are creating a work list of all the queries for every object we hope to place in the scene and sending all that work to the solver at once. Because the Object Placement Solver is computationally intensive it is better to do all of this work at once while the scene is loading. For this example I place the result of the query for each object in a work queue called _results which is serviced every frame. This causes the objects to pop up as each object is found, this probably is not desirable for a real application, but helps demonstrate the speed of the solver. When the solver is unable to place an item we continue without any errors to the user. The goal for this demo is to fill all the available floor space with holograms, not to display every hologram.
Switch back to Unity 3D. The Placement GameObject now has additional properties to configure. Set them with the following settings:
Build and Deploy to your device. Make sure you map a lot of floor space, and you should now see three buildings. Notice that if you map a small amount of floor space the ObjectPlacer handles it gracefully and only displays as many holograms that it can fit in the available floor space.
Add other Types of Holograms
Next we will extend this to generate many different types of buildings, and create an entire town. Update ObjectCollectionManager.cs with these changes:
https://gist.github.com/CameronVetter/186680084516374dce8edd1659f778e9
These changes add properties to allow you to specify other types of building and trees. These work just like the methods we created earlier to create wide buildings.
Modify ObjectPlacer.cs to contain these contents:
https://gist.github.com/CameronVetter/575d91e6df99fe312296866a703b86b5
These changes add an extra property that is used to tell the ObjectPlacer whether or not to draw the trees. We also added some logic to find locations for these trees. Notice that in the CreateScene method we are creating a work list of all the queries for every object we hope to place in the scene and sending all that work to the solver at once. Because the Object Placement Solver is computationally intensive it is better to do all of this work at once while the scene is loading. For this example I place the result of the query for each object in a work queue called _results which is serviced every frame. This causes the objects to pop up as each object is found, this probably is not desirable for a real application, but helps demonstrate the speed of the solver. When the solver is unable to place an item we continue without any errors to the user. The goal for this demo is to fill all the available floor space with holograms, not to display every hologram.
Switch back to Unity 3D. The Placement GameObject now has additional properties to configure. Set them with the following settings:
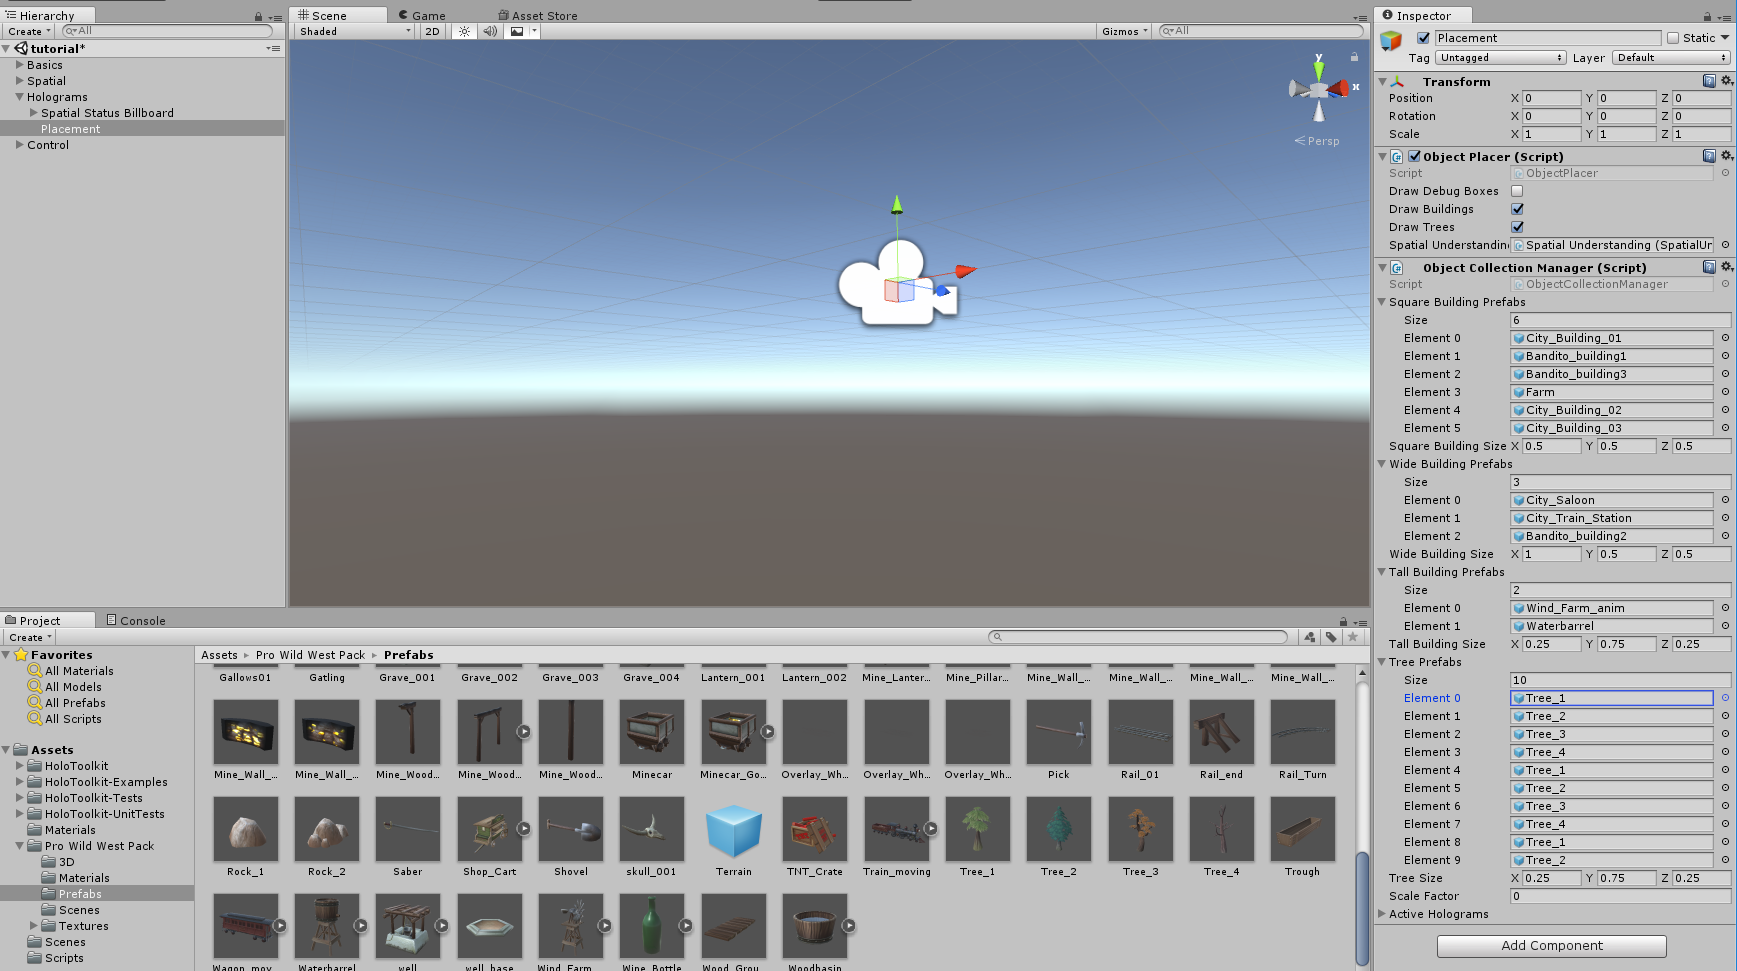 Build and Deploy to your device. You should now see a complete town generated. Because the spatial map is slightly different each time, the solver will place items differently in the same room. ObjectPlacer and ObjectCollectionManager can easily be customized to manage holograms for a different application, or even generalized as a component to use across different applications.
Tutorial Index
[rps-include post=186]
Build and Deploy to your device. You should now see a complete town generated. Because the spatial map is slightly different each time, the solver will place items differently in the same room. ObjectPlacer and ObjectCollectionManager can easily be customized to manage holograms for a different application, or even generalized as a component to use across different applications.
Tutorial Index
[rps-include post=186]Originally published April 29, 2017. Preserved from the legacy CameronVetter.com archive.