From the archive
HoloLens Tutorial - Object Placement and Scaling
Last Updated: Apr 23, 2017
Tutorial Accomplishments- Use Spatial Understanding to find the location for a hologram
- Instantiate the hologram in the world
- Scale the hologram to the size of the available space
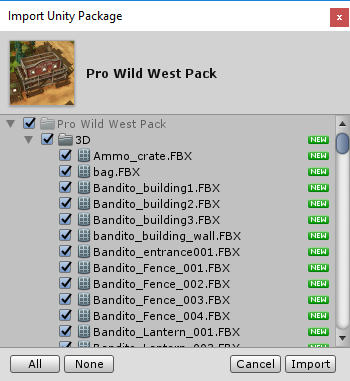 With everything selected click the Import button. A new folder is created in your Assets folder called "Pro Wild West Pack". Browse through the folders and you will find all the parts that make up the 3D objects. For this project we will use the contents of the Prefabs folder.
Disable the Spatial map and the Billboard
Before we display a hologram, we need to disable the spatial map visualization and the billboard containing text. Although this is only tangentially related to placement we will do this as the beginning of the script for object placement. Create an empty GameObject under Holograms and name it "Placement". In the project Pane, select Scripts. Create a new script called "ObjectPlacer.cs". Add the component Object Placer to the Placement node in the Hierarchy. Your project should now look like this:
With everything selected click the Import button. A new folder is created in your Assets folder called "Pro Wild West Pack". Browse through the folders and you will find all the parts that make up the 3D objects. For this project we will use the contents of the Prefabs folder.
Disable the Spatial map and the Billboard
Before we display a hologram, we need to disable the spatial map visualization and the billboard containing text. Although this is only tangentially related to placement we will do this as the beginning of the script for object placement. Create an empty GameObject under Holograms and name it "Placement". In the project Pane, select Scripts. Create a new script called "ObjectPlacer.cs". Add the component Object Placer to the Placement node in the Hierarchy. Your project should now look like this:
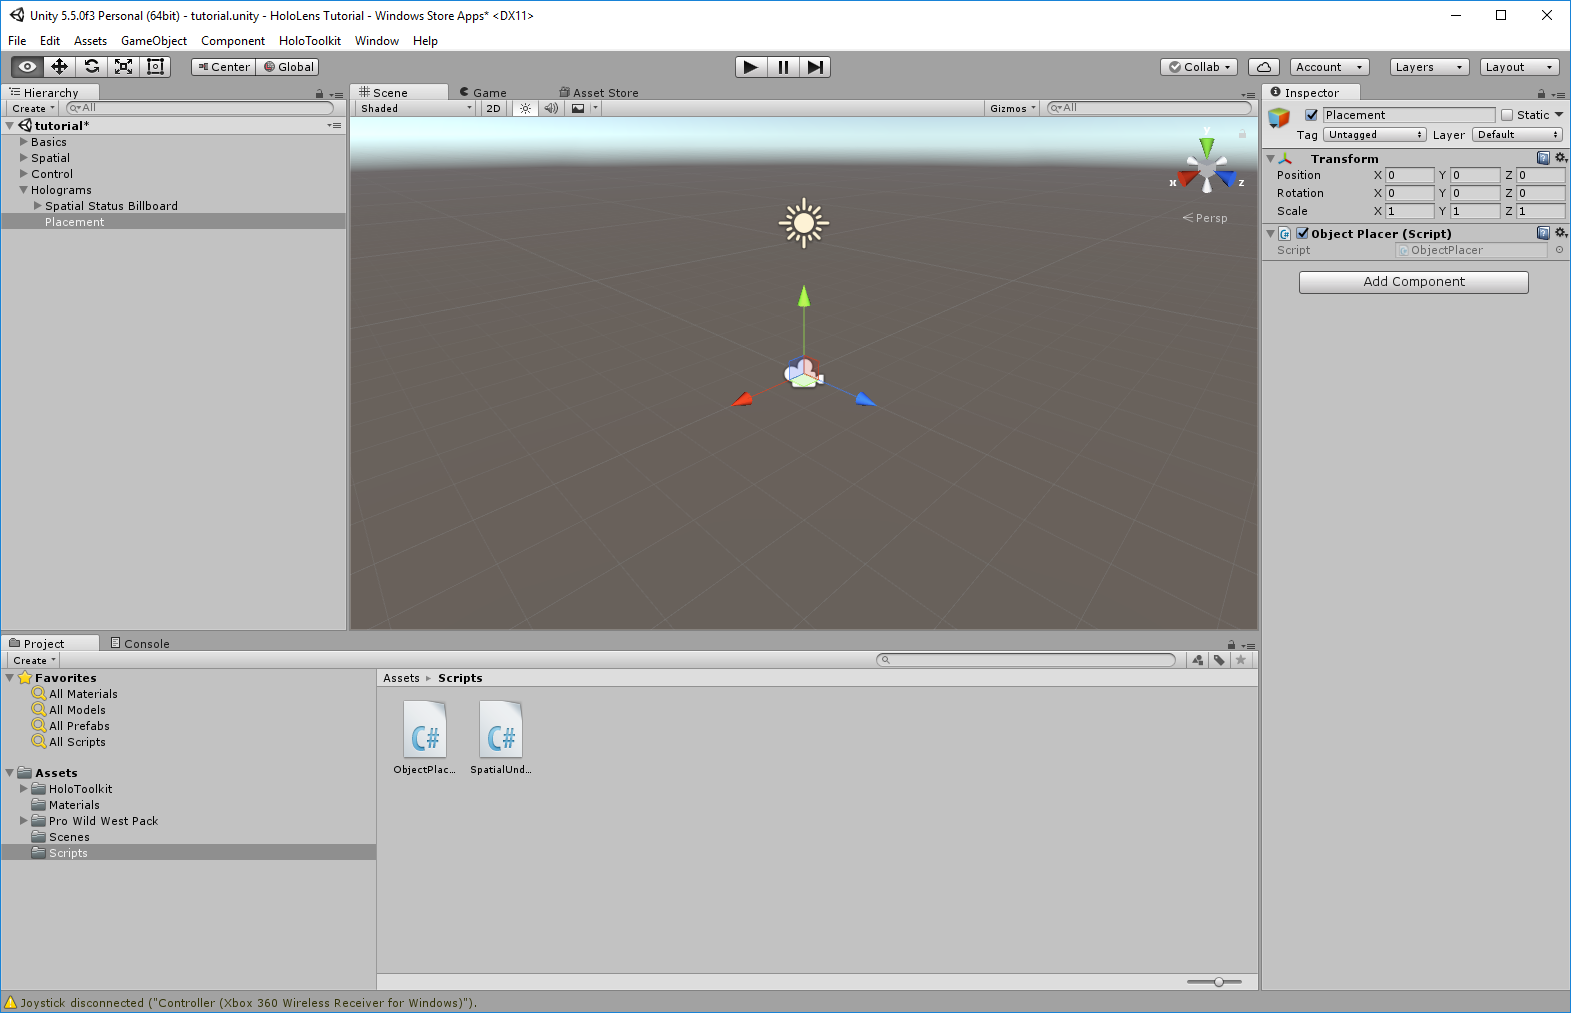 Add the following contents to ObjectPlacer.cs:
https://gist.github.com/CameronVetter/518efba38a0a55dd44ff1c91899cb87d
Also modify the method Update in SpatialUnderstandingState.cs to contain the following code:
https://gist.github.com/CameronVetter/468c777d4c424cee33a339d60f9cef8b
In unity Select Spatial Status Billboard in the Hierarchy. Drag the Placement GameObject into the Spatial Understanding State Component into the Placer property.
Add the following contents to ObjectPlacer.cs:
https://gist.github.com/CameronVetter/518efba38a0a55dd44ff1c91899cb87d
Also modify the method Update in SpatialUnderstandingState.cs to contain the following code:
https://gist.github.com/CameronVetter/468c777d4c424cee33a339d60f9cef8b
In unity Select Spatial Status Billboard in the Hierarchy. Drag the Placement GameObject into the Spatial Understanding State Component into the Placer property.
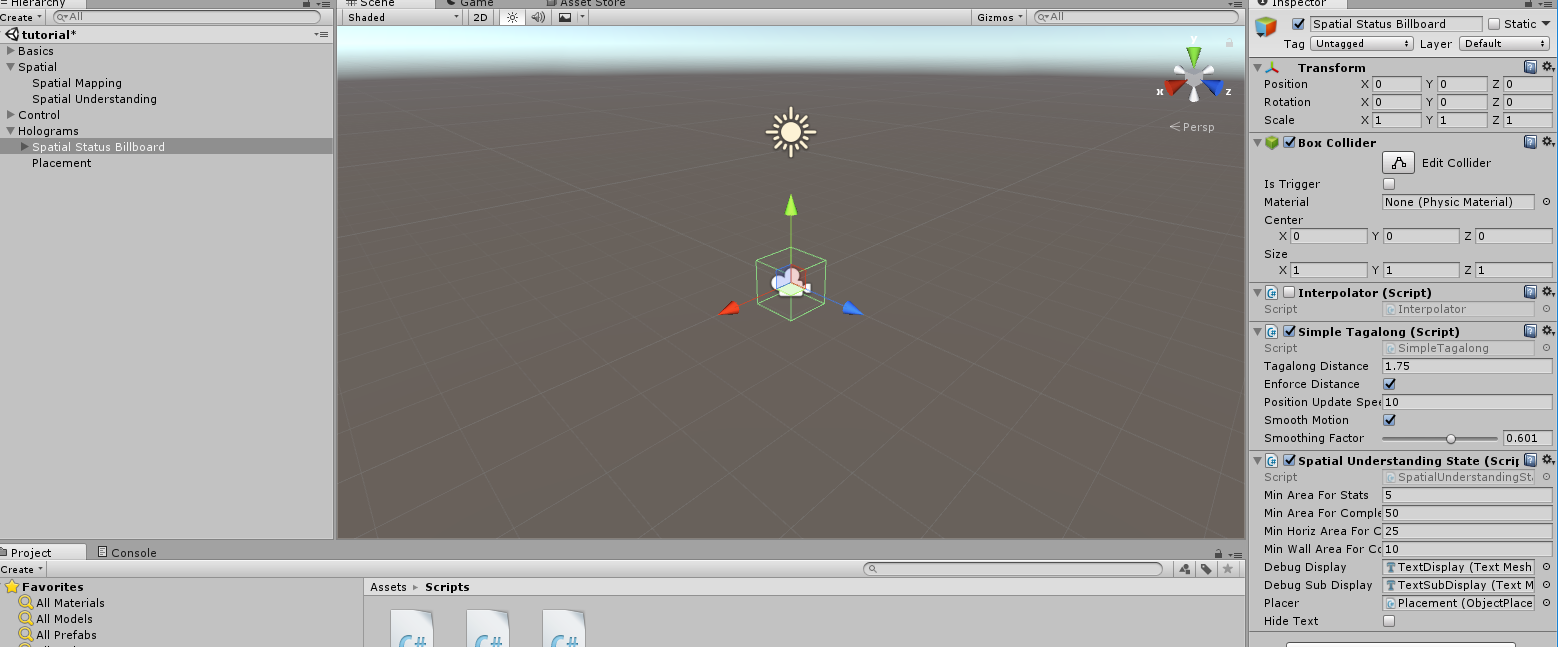 These changes allow the application to call the CreateScene method of the ObjectPlacer.cs script on the specific instance that is attached to the Placement GameObject. Next select the Placement GameObject in the Hierarchy. Drag the Spatial Understanding GameObject onto the Object Placer component in the Spatial Understanding property. This will allow the Object Placer script to control the state of the Spatial Understanding by giving it a reference to the instance of the script.
Build your project and run it on either the emulator or the HoloLens. Now when you finalize the spatial understanding the text is disabled by setting SpatialUnderstandingState.Instance.HideText to true in ObjectPlacer.cs and the material showing the spatial understanding map is disabled by setting SpatialUnderstandingMesh.DrawProcessedMesh to false. This sets us up with a clean environment to display Holograms in as well as giving us an easy place to instantiate holograms that occurs immediately after spatial understanding is finalized.
Place the Hologram
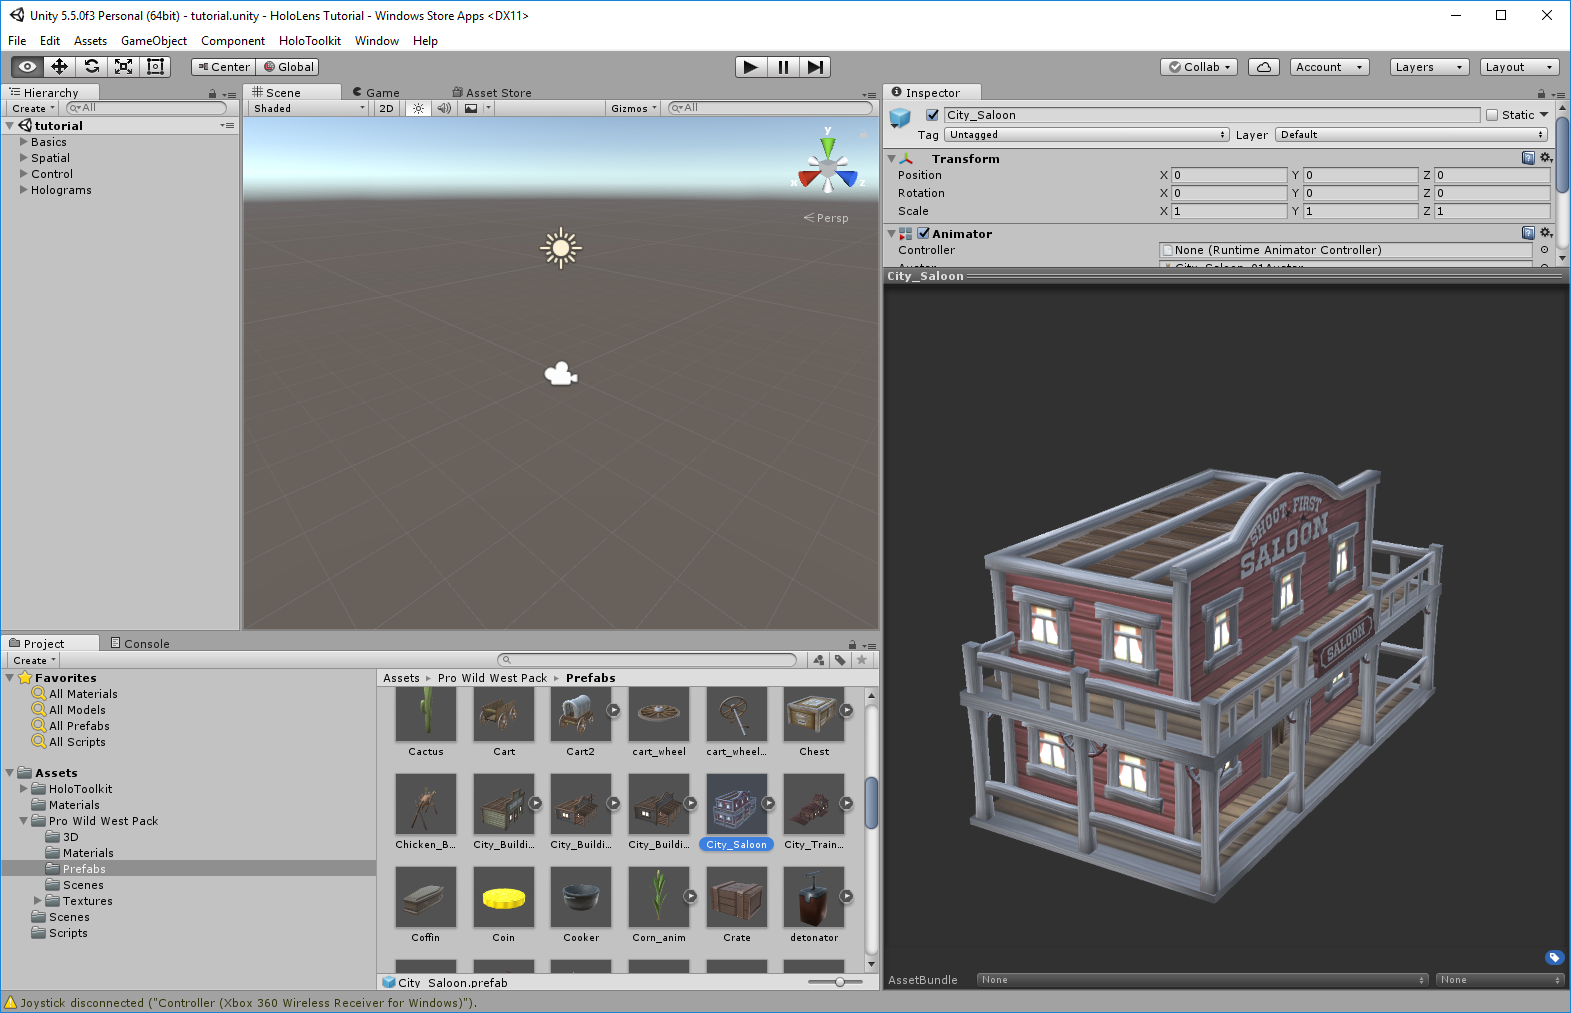
Next we will use Spatial Understanding to find a location to place city_Saloon.prefab. This prefab is found here and looks like this:
These changes allow the application to call the CreateScene method of the ObjectPlacer.cs script on the specific instance that is attached to the Placement GameObject. Next select the Placement GameObject in the Hierarchy. Drag the Spatial Understanding GameObject onto the Object Placer component in the Spatial Understanding property. This will allow the Object Placer script to control the state of the Spatial Understanding by giving it a reference to the instance of the script.
Build your project and run it on either the emulator or the HoloLens. Now when you finalize the spatial understanding the text is disabled by setting SpatialUnderstandingState.Instance.HideText to true in ObjectPlacer.cs and the material showing the spatial understanding map is disabled by setting SpatialUnderstandingMesh.DrawProcessedMesh to false. This sets us up with a clean environment to display Holograms in as well as giving us an easy place to instantiate holograms that occurs immediately after spatial understanding is finalized.
Place the Hologram
Next we will use Spatial Understanding to find a location to place city_Saloon.prefab. This prefab is found here and looks like this:
 Before we place the actual hologram lets draw the outline of a box where spatial understanding tells us to place our hologram. This is useful to have as an option for troubleshooting and debugging and will help demonstrate exactly what is happening. We will again borrow code from the Spatial Understanding example included with the HoloToolkit, with some small tweaks to decouple it from that example. I'm not going to go into detail explaining this code since I did not write it, but the basic idea is that every frame it draws lines representing the boxes that are passed to it. Create a new script caller "BoxDrawer.cs" and add these contents to it:
https://gist.github.com/CameronVetter/0e2b30e59b94f1d18d76505ae18d50c5
In your Scripts folder also create a new script called "PlacementQuery.cs". Add the following code to it:
https://gist.github.com/CameronVetter/2731e634f6ae01ac827b707efa36b175
This script creates a data object that is used to keep track of a spatial understanding request. Why not just make the request right away and skip storing the request in a data structure? Right now that would work fine, but eventually we want to create many holograms, and the most efficient way to do this is to feed all the requests to spatial understanding at once in a separate thread so that the UI thread doesn't lock up for the user which would make the HoloLens appear to lock up. For the same reason, we also will need to create the script "PlacementResult.cs":
https://gist.github.com/CameronVetter/5ffdccd53a17c58be3426069d2afc93f
Next make these changes to ObjectPlacer.cs:
https://gist.github.com/CameronVetter/61e0acf1120a95fe44ef5da137c1796f
We have created some public properties on ObjectPlacer.cs, these properties keep track of the desired size of the hologram we are creating and a reference to the hologram. These are done in public properties so that changes to the hologram or its size can be made in Unity with having to change the code. In the next tutorial we will expand this concept further to allow us to create any number or holograms at different sizes. Start and Update are both updated to support boxdrawer.cs to draw boxes if the public debug boxes property is checked. We again make this a public property so that we can change it in unity without touching any code.
The CreateScene method first checks to make sure that spatial understanding is ready, if it is not it exits immediately. (In a real application you would want to do something to attempt to recover at this point) Next the Spatial Understanding solver is initialized and we update the billboard to let the user know we are generating the world. The next call creates a list of work for the solver to do containing 1 item that is trying to solve for the size of the building and then we make a call to start doing the work in GetLocationsFromSolver.
GetLocationFromSolver starts a separate thread and attempts to complete each work item in the list that was given to it by making a call to PlaceObject. The Result of that call is added to the results queue for drawing. PlaceObject makes the actual call to Spatial Understanding taking all of the information about the work to be completed as parameters.
The Update method also makes a call to ProcessPlacementResults on every frame. This method checks for any work in the work queue, and if there is any it takes one item off of the queue and draws a box for it. This method only does one item of work in the queue per frame to make sure the frame rate is not impacted.
In Unity select the Placement GameObject in the Hierarchy. Find the City_Saloon.prefab in the Assets folder in your project pane. Drag the prefab to the Saloon Building Prefab property in the Object Placer Component. Your project should now look like this:
Before we place the actual hologram lets draw the outline of a box where spatial understanding tells us to place our hologram. This is useful to have as an option for troubleshooting and debugging and will help demonstrate exactly what is happening. We will again borrow code from the Spatial Understanding example included with the HoloToolkit, with some small tweaks to decouple it from that example. I'm not going to go into detail explaining this code since I did not write it, but the basic idea is that every frame it draws lines representing the boxes that are passed to it. Create a new script caller "BoxDrawer.cs" and add these contents to it:
https://gist.github.com/CameronVetter/0e2b30e59b94f1d18d76505ae18d50c5
In your Scripts folder also create a new script called "PlacementQuery.cs". Add the following code to it:
https://gist.github.com/CameronVetter/2731e634f6ae01ac827b707efa36b175
This script creates a data object that is used to keep track of a spatial understanding request. Why not just make the request right away and skip storing the request in a data structure? Right now that would work fine, but eventually we want to create many holograms, and the most efficient way to do this is to feed all the requests to spatial understanding at once in a separate thread so that the UI thread doesn't lock up for the user which would make the HoloLens appear to lock up. For the same reason, we also will need to create the script "PlacementResult.cs":
https://gist.github.com/CameronVetter/5ffdccd53a17c58be3426069d2afc93f
Next make these changes to ObjectPlacer.cs:
https://gist.github.com/CameronVetter/61e0acf1120a95fe44ef5da137c1796f
We have created some public properties on ObjectPlacer.cs, these properties keep track of the desired size of the hologram we are creating and a reference to the hologram. These are done in public properties so that changes to the hologram or its size can be made in Unity with having to change the code. In the next tutorial we will expand this concept further to allow us to create any number or holograms at different sizes. Start and Update are both updated to support boxdrawer.cs to draw boxes if the public debug boxes property is checked. We again make this a public property so that we can change it in unity without touching any code.
The CreateScene method first checks to make sure that spatial understanding is ready, if it is not it exits immediately. (In a real application you would want to do something to attempt to recover at this point) Next the Spatial Understanding solver is initialized and we update the billboard to let the user know we are generating the world. The next call creates a list of work for the solver to do containing 1 item that is trying to solve for the size of the building and then we make a call to start doing the work in GetLocationsFromSolver.
GetLocationFromSolver starts a separate thread and attempts to complete each work item in the list that was given to it by making a call to PlaceObject. The Result of that call is added to the results queue for drawing. PlaceObject makes the actual call to Spatial Understanding taking all of the information about the work to be completed as parameters.
The Update method also makes a call to ProcessPlacementResults on every frame. This method checks for any work in the work queue, and if there is any it takes one item off of the queue and draws a box for it. This method only does one item of work in the queue per frame to make sure the frame rate is not impacted.
In Unity select the Placement GameObject in the Hierarchy. Find the City_Saloon.prefab in the Assets folder in your project pane. Drag the prefab to the Saloon Building Prefab property in the Object Placer Component. Your project should now look like this:
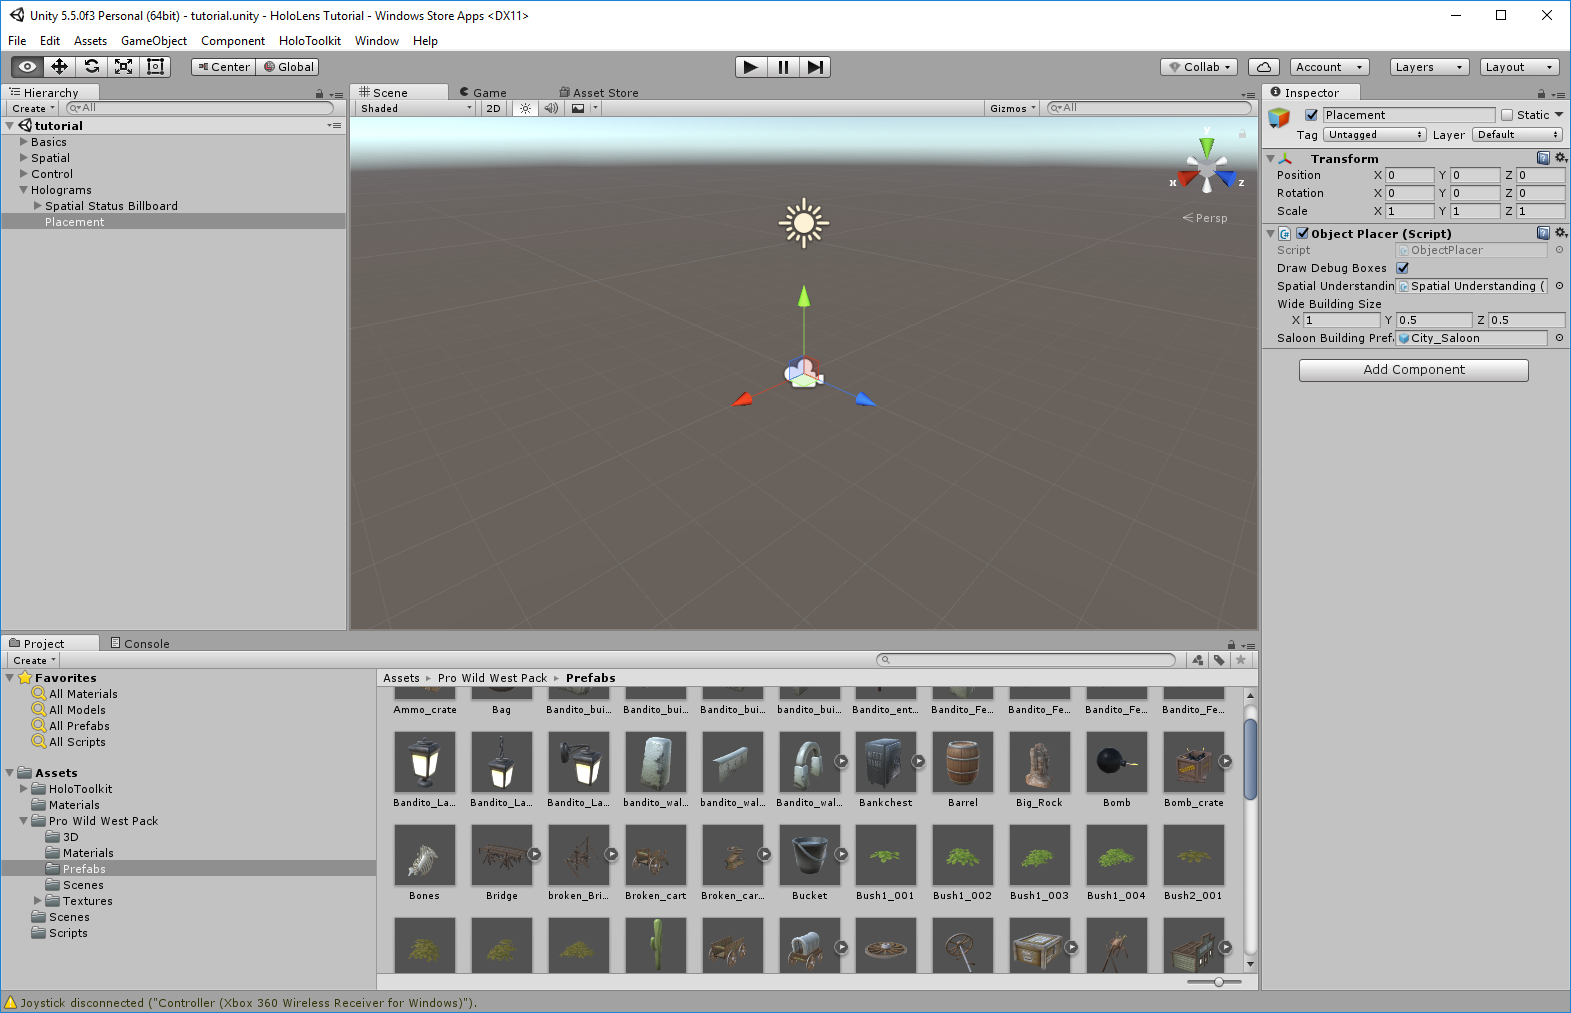 Why did we need to reference the Saloon prefab if we are only drawing a box? The reason is because we are using the size and shape of the prefab that we eventually want to draw for the space request that we make to spatial understanding. We will also use this later when we instantiate the hologram into the world. Build the app and run the app in the emulator or on the device.
Instantiate and scale the Hologram in the world
Next make the following changes to ObjectPlacer.cs:
https://gist.github.com/CameronVetter/f31dda5308c42461472e6cb218facda4
First we change the default for debug boxes to false. We still want the ability to turn them on and off through a check box but normally we will want them to be disabled. The method ProcessPlacementResults has been changed to calculate the correct rotation for the hologram and create the building with a call to CreateWideBuilding.
CreateWideBuilding starts by calculating the correct position for placement of the hologram. The position that spatial understanding gives us is the exact center of the area in three dimensional space, but the position that unity wants is the bottom center of the area. In other words we want the center of the desired location for the hologram in the X and Z planes, but the start of the hologram in the Y plane. Next we call instantiate passing the hologram, position and rotation desired. If the hologram is instantiated correctly, we parent the hologram to the Placement GameObject in the hierarchy and set the local scale to the desired size for the hologram.
The scaling relies on a series of utility methods that I have created called GetBoundsForAllChildren, CalcScaleFactorHelper, and RescaleToDesiredSizeProportional. GetBoundsForAllChildren examines the hologram and all its children and creates a bounding box for that hologram and its children. The bounding box is then used in CalcScaleFactorHelper to find the largest scaling factor that will allow the hologram to fit in the space requested from Spatial Understanding (desiredSize). RescaleToDesiredSizeProportional uses the results of CalcScaleFactorHelper to create a vector3 that is the local scale transform that should be applied to the hologram to get the desired size.
Build the app and run the app in the emulator or on the device. The application now displays the saloon scaled to the correct size based on the results from Spatial Understanding.
Tutorial Index
[rps-include post=186]
Why did we need to reference the Saloon prefab if we are only drawing a box? The reason is because we are using the size and shape of the prefab that we eventually want to draw for the space request that we make to spatial understanding. We will also use this later when we instantiate the hologram into the world. Build the app and run the app in the emulator or on the device.
Instantiate and scale the Hologram in the world
Next make the following changes to ObjectPlacer.cs:
https://gist.github.com/CameronVetter/f31dda5308c42461472e6cb218facda4
First we change the default for debug boxes to false. We still want the ability to turn them on and off through a check box but normally we will want them to be disabled. The method ProcessPlacementResults has been changed to calculate the correct rotation for the hologram and create the building with a call to CreateWideBuilding.
CreateWideBuilding starts by calculating the correct position for placement of the hologram. The position that spatial understanding gives us is the exact center of the area in three dimensional space, but the position that unity wants is the bottom center of the area. In other words we want the center of the desired location for the hologram in the X and Z planes, but the start of the hologram in the Y plane. Next we call instantiate passing the hologram, position and rotation desired. If the hologram is instantiated correctly, we parent the hologram to the Placement GameObject in the hierarchy and set the local scale to the desired size for the hologram.
The scaling relies on a series of utility methods that I have created called GetBoundsForAllChildren, CalcScaleFactorHelper, and RescaleToDesiredSizeProportional. GetBoundsForAllChildren examines the hologram and all its children and creates a bounding box for that hologram and its children. The bounding box is then used in CalcScaleFactorHelper to find the largest scaling factor that will allow the hologram to fit in the space requested from Spatial Understanding (desiredSize). RescaleToDesiredSizeProportional uses the results of CalcScaleFactorHelper to create a vector3 that is the local scale transform that should be applied to the hologram to get the desired size.
Build the app and run the app in the emulator or on the device. The application now displays the saloon scaled to the correct size based on the results from Spatial Understanding.
Tutorial Index
[rps-include post=186]Originally published January 30, 2017. Preserved from the legacy CameronVetter.com archive.