From the archive
HoloLens Tutorial - Unity 3d Project Creation
Last Updated: Aug 27, 2017
Tutorial Accomplishments
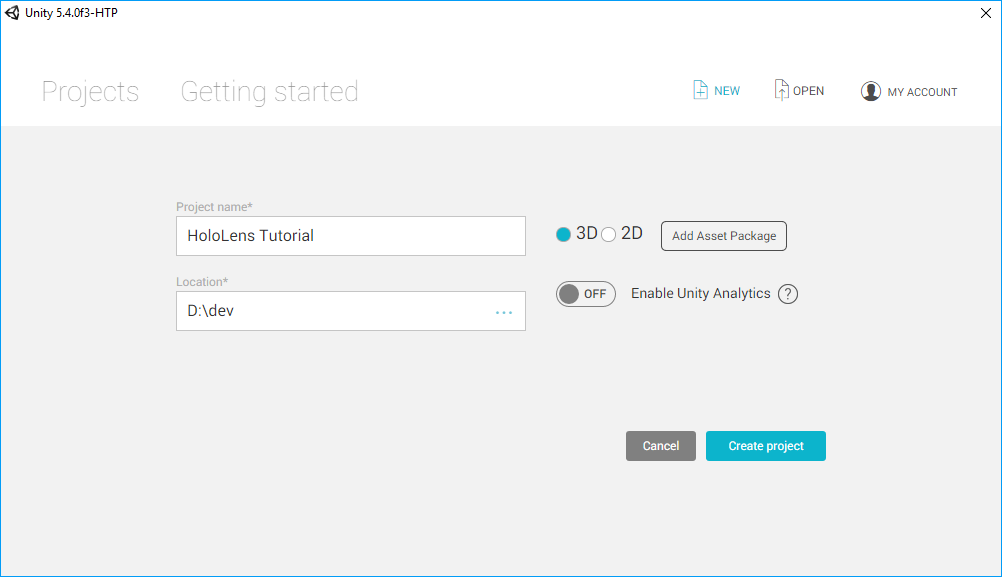 Click Create project. The Unity Editor should display containing your empty project.
MixedRealityToolkit Installation
The Unity MixedRealityToolkit is available on GitHub. There are older parts of the toolkit in the HoloAcademy tutorials, which you should avoid using! I would urge you to check out the HoloAcademy tutorials, the concepts are still very valid and it is a helpful foundation, but the MRToolkit parts are old and outdated and create confusion for new developers.
Click Create project. The Unity Editor should display containing your empty project.
MixedRealityToolkit Installation
The Unity MixedRealityToolkit is available on GitHub. There are older parts of the toolkit in the HoloAcademy tutorials, which you should avoid using! I would urge you to check out the HoloAcademy tutorials, the concepts are still very valid and it is a helpful foundation, but the MRToolkit parts are old and outdated and create confusion for new developers.
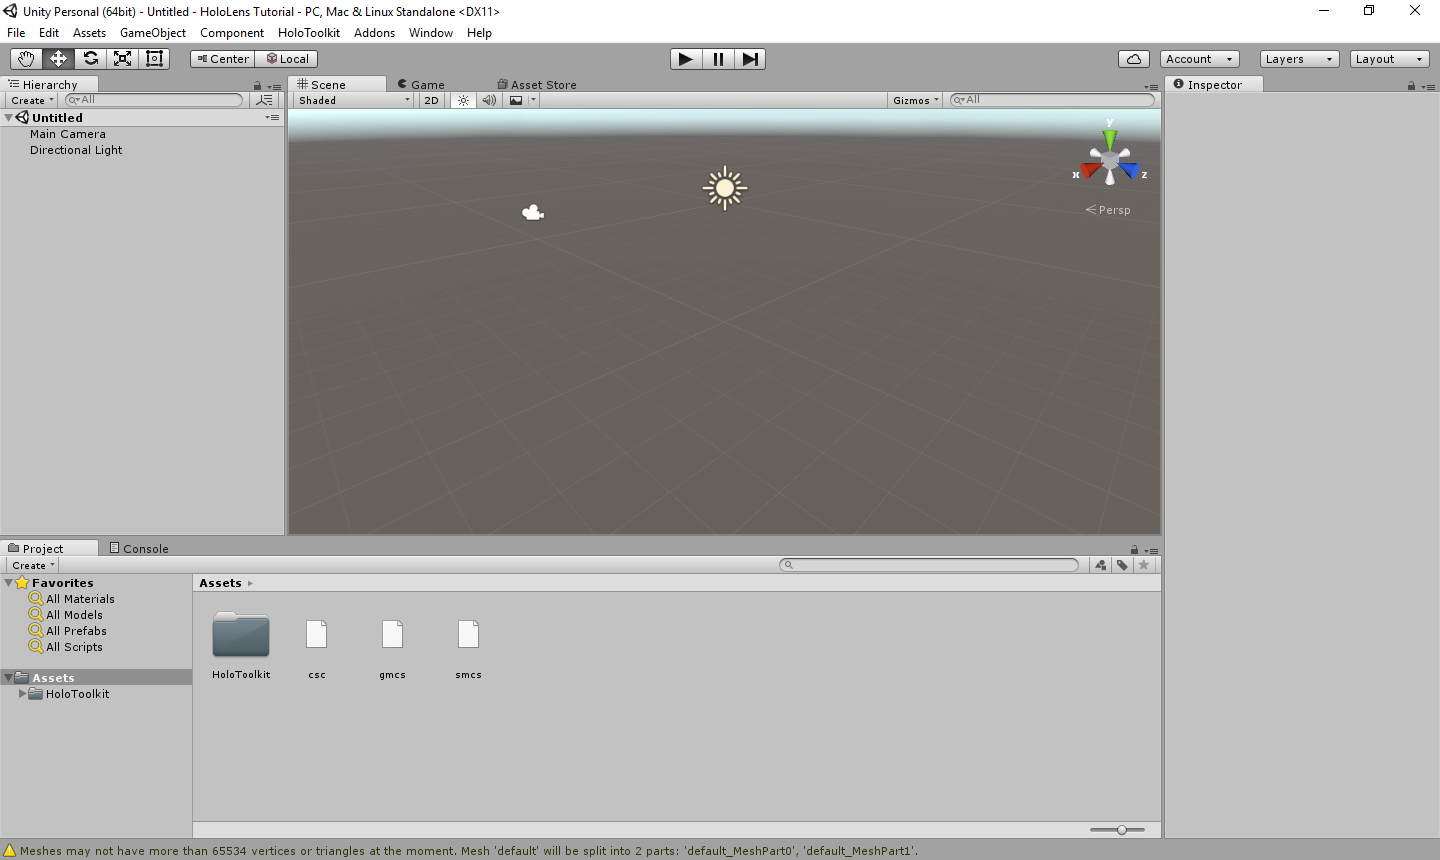 Notice that in the project pane the assets folder now contains the HoloToolkit folder and three other files. These three extra files that look like junk are actually configuration files for Unity that configures some advanced settings to allow the interop to work correctly. You must leave these files in place for your project to build correctly. The folder is called HoloToolkit for legacy reasons, this will change in a future release of the MRToolkit.
Unity Project Configuration
A default unity project opens an unsaved scene with a main camera and a directional light. In this section we are going to modify the scene to work with HoloLens. Start by deleting "Main Camera" from the Hierarchy. In the project pane navigate to the Assets/HoloToolkit/Input/Prefabs folder and select HoloLensCamera. Similar to the picture below:
Notice that in the project pane the assets folder now contains the HoloToolkit folder and three other files. These three extra files that look like junk are actually configuration files for Unity that configures some advanced settings to allow the interop to work correctly. You must leave these files in place for your project to build correctly. The folder is called HoloToolkit for legacy reasons, this will change in a future release of the MRToolkit.
Unity Project Configuration
A default unity project opens an unsaved scene with a main camera and a directional light. In this section we are going to modify the scene to work with HoloLens. Start by deleting "Main Camera" from the Hierarchy. In the project pane navigate to the Assets/HoloToolkit/Input/Prefabs folder and select HoloLensCamera. Similar to the picture below:
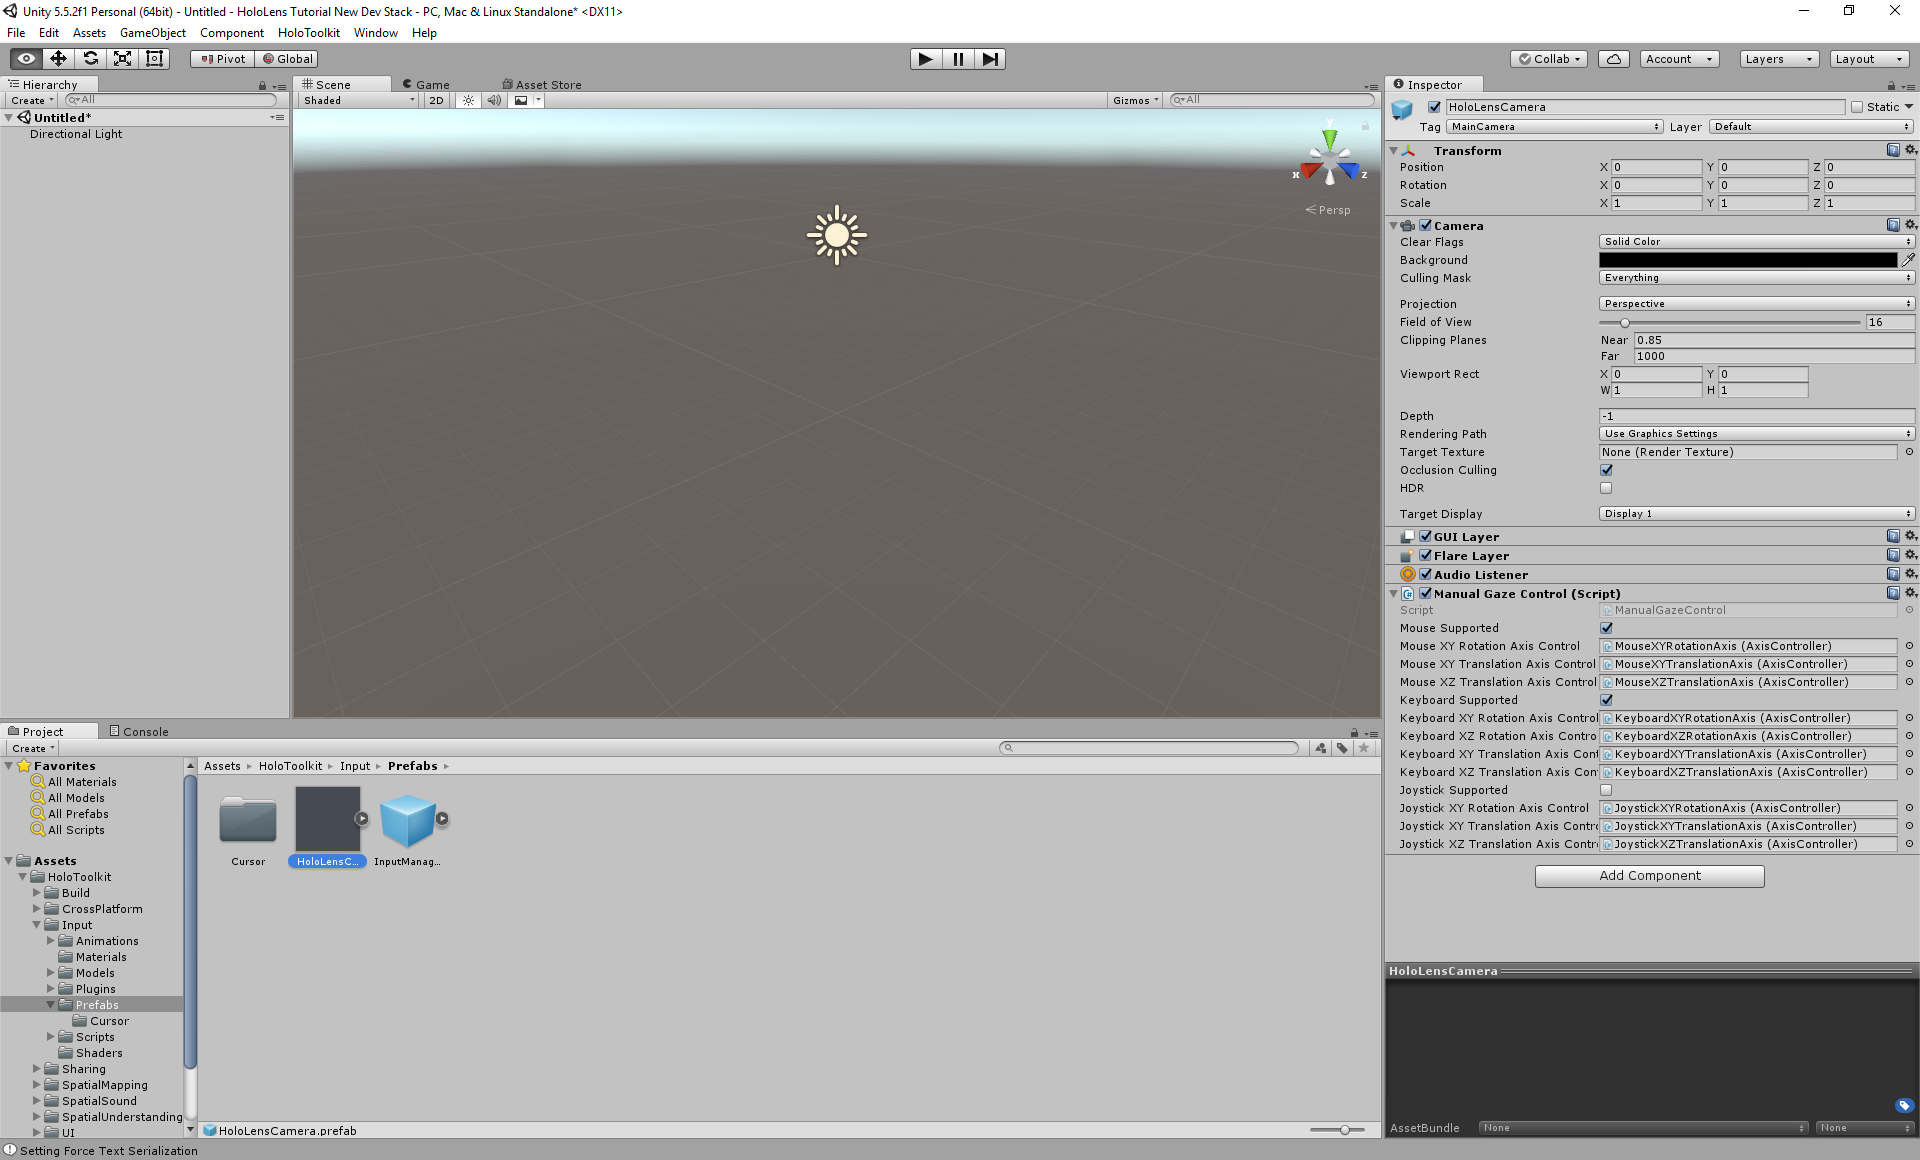 Drag the HoloLensCamera prefab into the Hierarchy. Leave the Directional Light in the scene. This light is not ideal, but is good for this tutorial. For a real project you would want to add numerous lights to create the correct atmosphere, but I'll save that for another tutorial.
From the File Menu select Save Scene. Create a new folder in "Assets" called "Scenes" and save the scene inside that folder with a name of your choosing. I will call mine "tutorial". Your Unity project should now look like this:
Drag the HoloLensCamera prefab into the Hierarchy. Leave the Directional Light in the scene. This light is not ideal, but is good for this tutorial. For a real project you would want to add numerous lights to create the correct atmosphere, but I'll save that for another tutorial.
From the File Menu select Save Scene. Create a new folder in "Assets" called "Scenes" and save the scene inside that folder with a name of your choosing. I will call mine "tutorial". Your Unity project should now look like this:
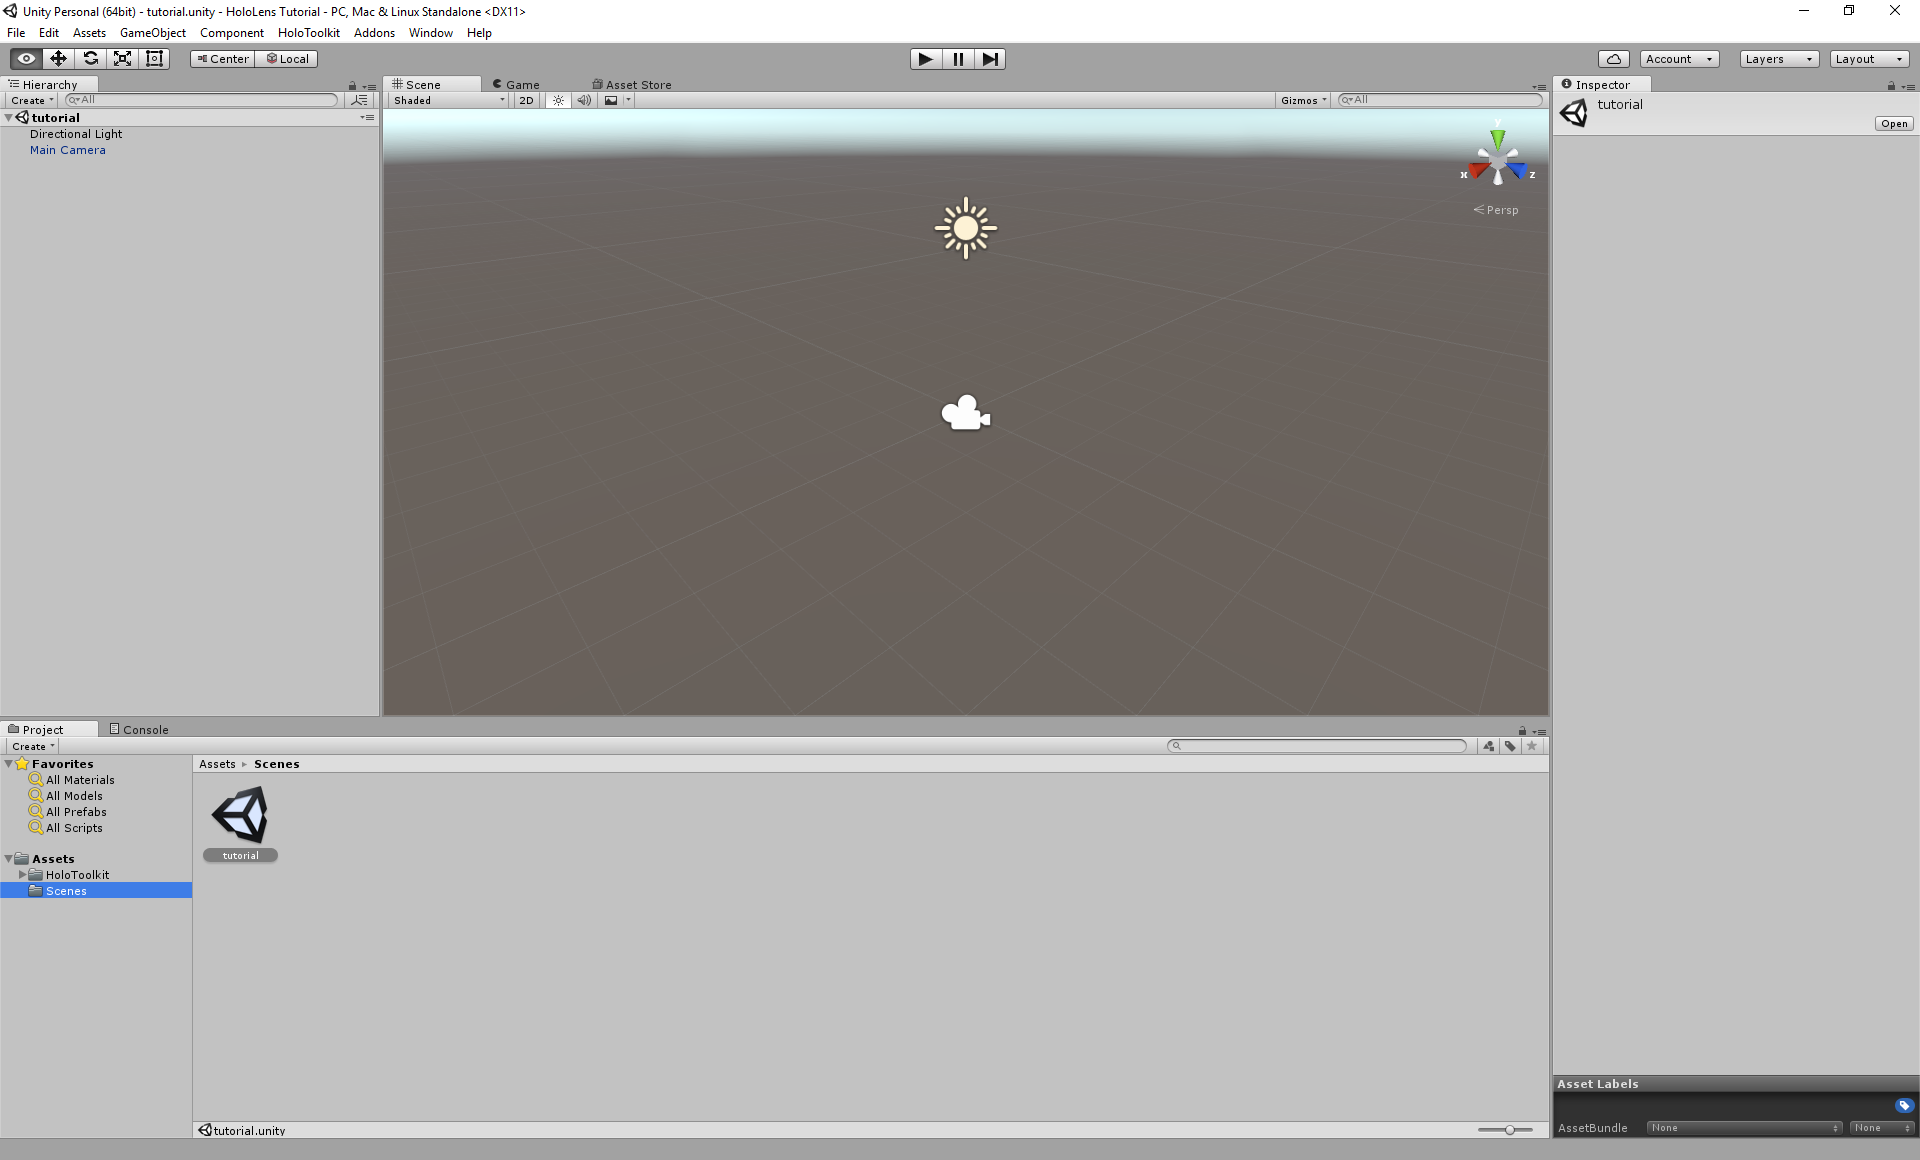 Notice that the top node in the Hierarchy is the name of your open scene.
Building for HoloLens
Before we can build the HoloLens project, we need to configure some Unity settings. From the HoloToolkit
Notice that the top node in the Hierarchy is the name of your open scene.
Building for HoloLens
Before we can build the HoloLens project, we need to configure some Unity settings. From the HoloToolkit  Menu select "Apply HoloLens Project Settings". You will see a dialog box asking if the wizard can enable text serialization click Yes. Allow the project to reload.
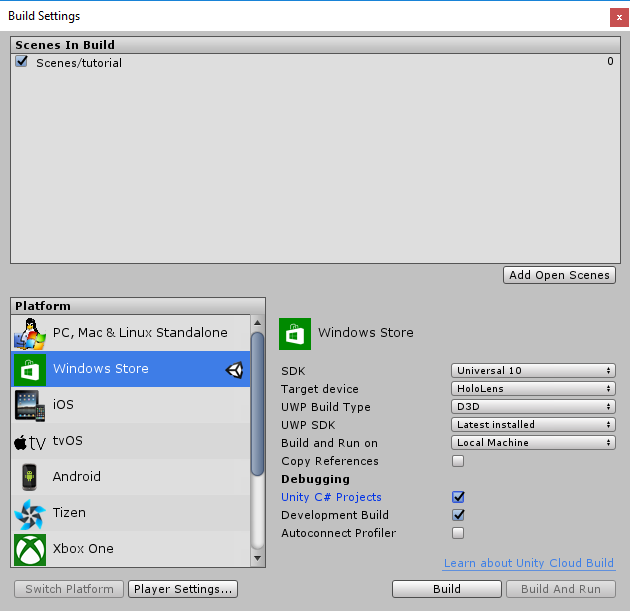 Click Add Open Scenes. For Target Device select HoloLens. Make sure to select "Development Build" and Unity C# project. The tells Unity to enable debug hooks that can be used later for profiling and to create the c# projects that you will build in visual studio.
Click Build and Create a folder in the root of your project directory called "App" and select that folder. Once the build completes successfully a Windows file explorer Window is displayed that shows the root folder of your project. Open the App folder and open the SLN that was created there.
Click Add Open Scenes. For Target Device select HoloLens. Make sure to select "Development Build" and Unity C# project. The tells Unity to enable debug hooks that can be used later for profiling and to create the c# projects that you will build in visual studio.
Click Build and Create a folder in the root of your project directory called "App" and select that folder. Once the build completes successfully a Windows file explorer Window is displayed that shows the root folder of your project. Open the App folder and open the SLN that was created there.
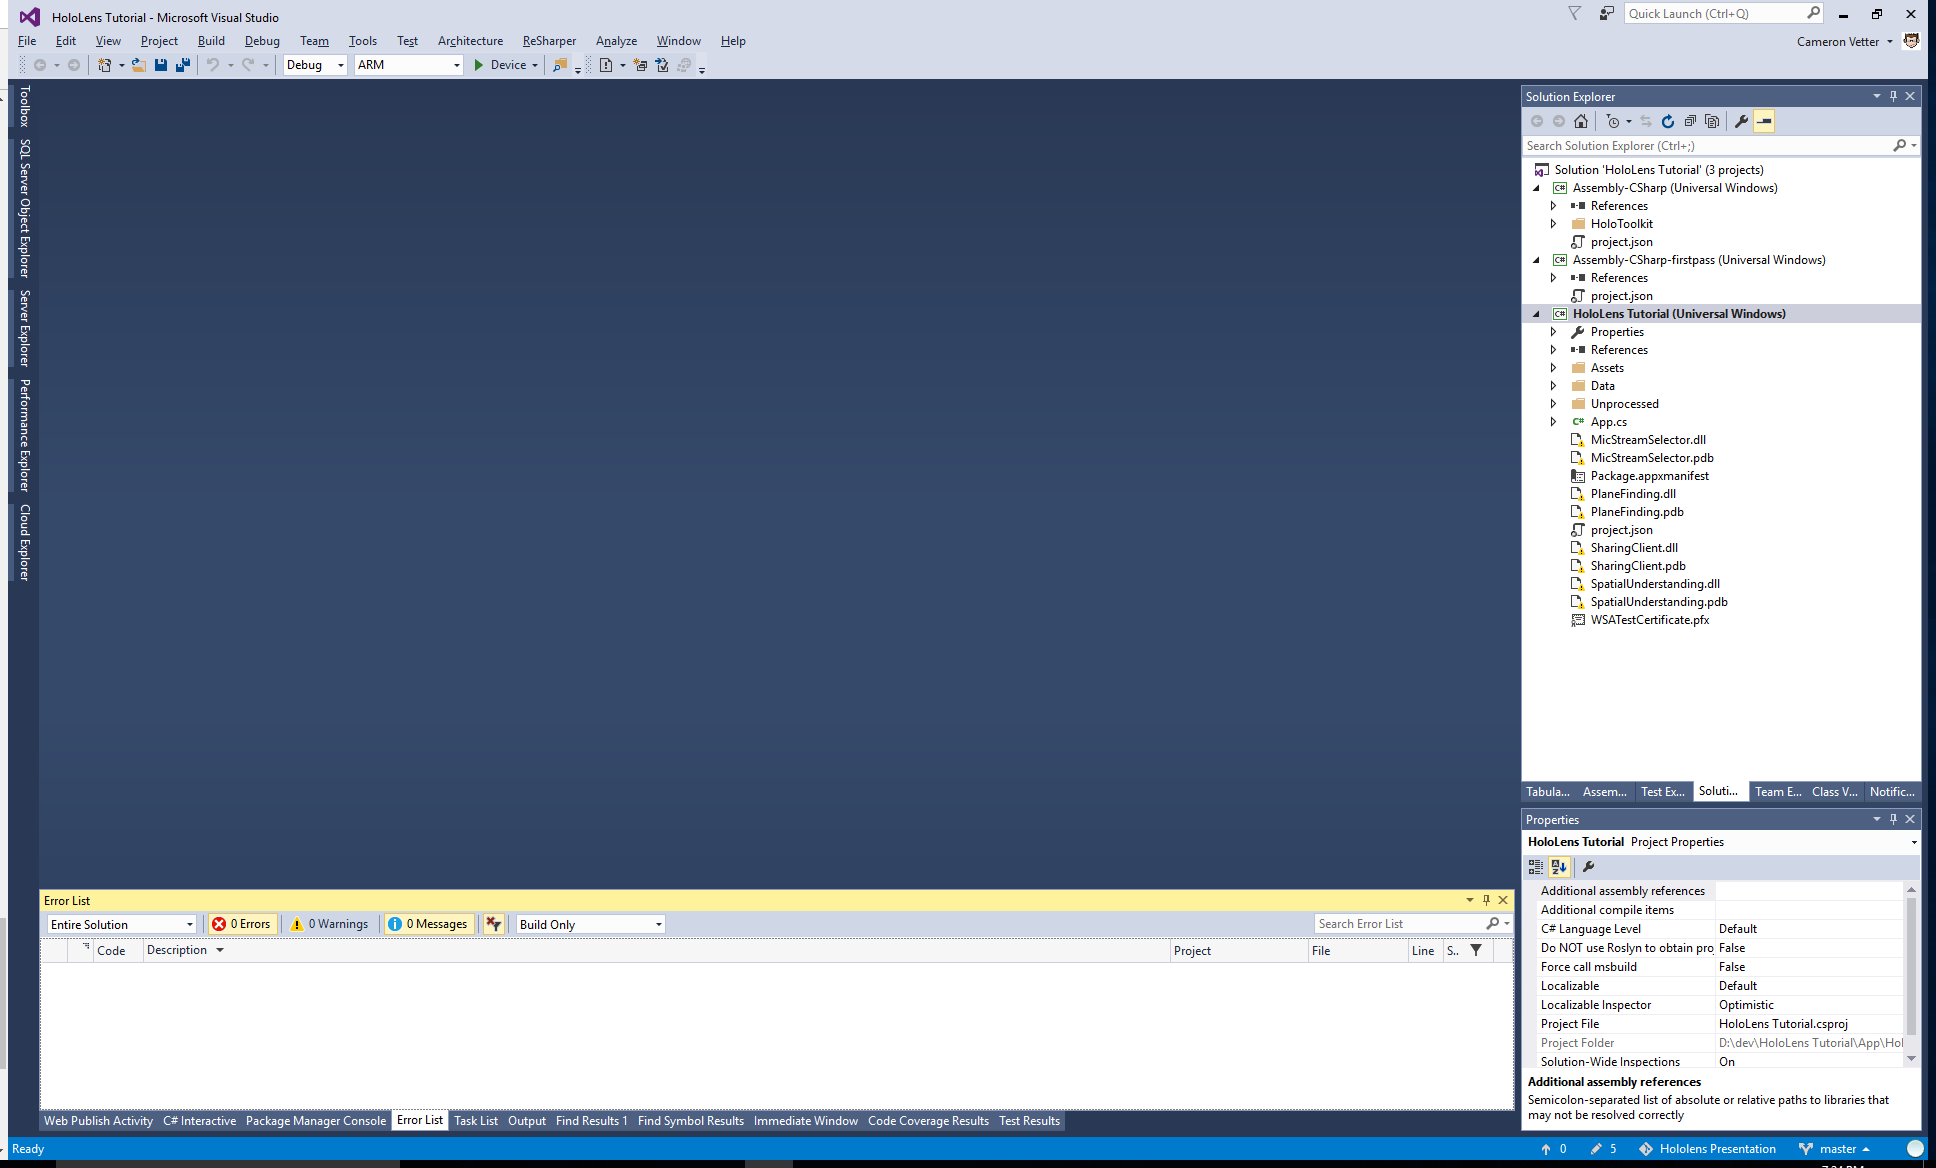 This solution is a ready to build HoloLens App!
Deploy to HoloLens
In the VS toolbar set the Solution Configuration to Release and the Solution Platform to x86. For Build Target select Remote Device. You will see this configuration screen:
This solution is a ready to build HoloLens App!
Deploy to HoloLens
In the VS toolbar set the Solution Configuration to Release and the Solution Platform to x86. For Build Target select Remote Device. You will see this configuration screen:
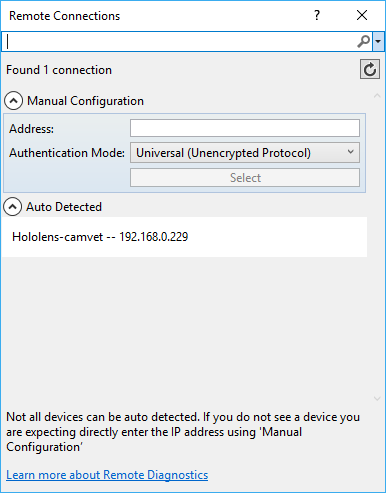 If everything goes well you will see your HoloLens listed as Auto Detected. Simply select it. If not on your HoloLens say "Hey Cortana, What is my IP Address" and enter the address, leaving authentication mode set to Universal. Click Debug, Start Debugging. Your project will build and deploy to the HoloLens, you should see a Unity Logo, followed by nothing because we have not implemented anything. Press Stop in Visual Studio closing the application on your HoloLens.
Deploy to Emulator
In the VS toolbar set the Solution Configuration to Release and the Solution Platform to x86. For Build Target select HoloLens Emulator. Click Debug, Start Debugging. Your project will build and deploy to the HoloLens Emulator, you should see a Unity Logo, followed by nothing because we have not implemented anything. Press Stop in Visual Studio closing the application on the Emulator. To learn more about the emulator visit the Hololens Emulator reference.
Tutorial Index
[rps-include post=186]
If everything goes well you will see your HoloLens listed as Auto Detected. Simply select it. If not on your HoloLens say "Hey Cortana, What is my IP Address" and enter the address, leaving authentication mode set to Universal. Click Debug, Start Debugging. Your project will build and deploy to the HoloLens, you should see a Unity Logo, followed by nothing because we have not implemented anything. Press Stop in Visual Studio closing the application on your HoloLens.
Deploy to Emulator
In the VS toolbar set the Solution Configuration to Release and the Solution Platform to x86. For Build Target select HoloLens Emulator. Click Debug, Start Debugging. Your project will build and deploy to the HoloLens Emulator, you should see a Unity Logo, followed by nothing because we have not implemented anything. Press Stop in Visual Studio closing the application on the Emulator. To learn more about the emulator visit the Hololens Emulator reference.
Tutorial Index
[rps-include post=186]
- Setup the HoloLens development tools
- Create the project
- Install the MixedReality Toolkit
- Setup the project setting for HoloLens
- Build and deploy to the HoloLens and/or the emulator
- Enable Hyper-V in your O/S through Control Panel -> Programs -> Programs and Features -> Turn Windows Features on or off
- Install Visual Studio 2017 15.3.2
- Install the HoloLens Emulator
- Install the Unity 2017.1.0p5
Click Create project. The Unity Editor should display containing your empty project.
MixedRealityToolkit Installation
The Unity MixedRealityToolkit is available on GitHub. There are older parts of the toolkit in the HoloAcademy tutorials, which you should avoid using! I would urge you to check out the HoloAcademy tutorials, the concepts are still very valid and it is a helpful foundation, but the MRToolkit parts are old and outdated and create confusion for new developers.
- Go to https://github.com/Microsoft/MixedRealityToolkit-Unity/releases/ and download the current release.
- Switch to Unity and Select Assets -> Import Package -> Custom Package.
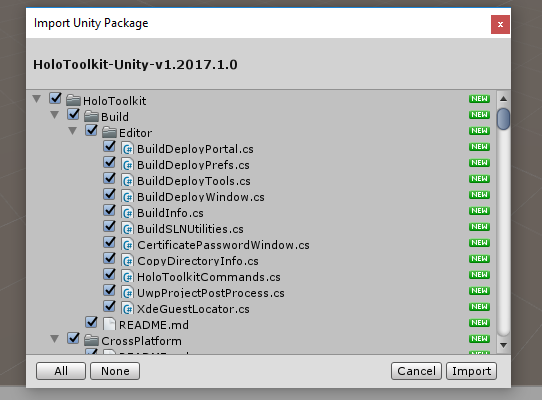
- Select the UnityPackage that you downloaded and Click Import all.
- Wait, this will take a while.
Notice that in the project pane the assets folder now contains the HoloToolkit folder and three other files. These three extra files that look like junk are actually configuration files for Unity that configures some advanced settings to allow the interop to work correctly. You must leave these files in place for your project to build correctly. The folder is called HoloToolkit for legacy reasons, this will change in a future release of the MRToolkit.
Unity Project Configuration
A default unity project opens an unsaved scene with a main camera and a directional light. In this section we are going to modify the scene to work with HoloLens. Start by deleting "Main Camera" from the Hierarchy. In the project pane navigate to the Assets/HoloToolkit/Input/Prefabs folder and select HoloLensCamera. Similar to the picture below:
Drag the HoloLensCamera prefab into the Hierarchy. Leave the Directional Light in the scene. This light is not ideal, but is good for this tutorial. For a real project you would want to add numerous lights to create the correct atmosphere, but I'll save that for another tutorial.
From the File Menu select Save Scene. Create a new folder in "Assets" called "Scenes" and save the scene inside that folder with a name of your choosing. I will call mine "tutorial". Your Unity project should now look like this:
Notice that the top node in the Hierarchy is the name of your open scene.
Building for HoloLens
Before we can build the HoloLens project, we need to configure some Unity settings. From the HoloToolkit Menu select "Apply HoloLens Project Settings". You will see a dialog box asking if the wizard can enable text serialization click Yes. Allow the project to reload.
What just happened?!?
- The Project QualitySettings were just set to "Fastest" for Windows Store Apps.
- The Build Settings were set to Windows Store App, SDK Universal 10, Build Type D3D
- The Project PlayerSettings were set to enable the Virtual Reality SDK "Windows Holographic"
Click Add Open Scenes. For Target Device select HoloLens. Make sure to select "Development Build" and Unity C# project. The tells Unity to enable debug hooks that can be used later for profiling and to create the c# projects that you will build in visual studio.
Click Build and Create a folder in the root of your project directory called "App" and select that folder. Once the build completes successfully a Windows file explorer Window is displayed that shows the root folder of your project. Open the App folder and open the SLN that was created there.
This solution is a ready to build HoloLens App!
Deploy to HoloLens
In the VS toolbar set the Solution Configuration to Release and the Solution Platform to x86. For Build Target select Remote Device. You will see this configuration screen:
If everything goes well you will see your HoloLens listed as Auto Detected. Simply select it. If not on your HoloLens say "Hey Cortana, What is my IP Address" and enter the address, leaving authentication mode set to Universal. Click Debug, Start Debugging. Your project will build and deploy to the HoloLens, you should see a Unity Logo, followed by nothing because we have not implemented anything. Press Stop in Visual Studio closing the application on your HoloLens.
Deploy to Emulator
In the VS toolbar set the Solution Configuration to Release and the Solution Platform to x86. For Build Target select HoloLens Emulator. Click Debug, Start Debugging. Your project will build and deploy to the HoloLens Emulator, you should see a Unity Logo, followed by nothing because we have not implemented anything. Press Stop in Visual Studio closing the application on the Emulator. To learn more about the emulator visit the Hololens Emulator reference.
Tutorial Index
[rps-include post=186]Originally published October 25, 2016. Preserved from the legacy CameronVetter.com archive.