From the archive
Using Azure Application Gateway WAF's to secure Azure Web Apps with Traffic Manager for Geo-redundancy Part 1
Why?
What lead me down this path is my desire to use PAAS whenever possible and avoid IAAS unless its absolutely necessary. Often the number one security requirement for a deployment is to put your services behind a WAF (Web Application Firewall) to offer a first line of defense against many different types of attacks.
Scenario
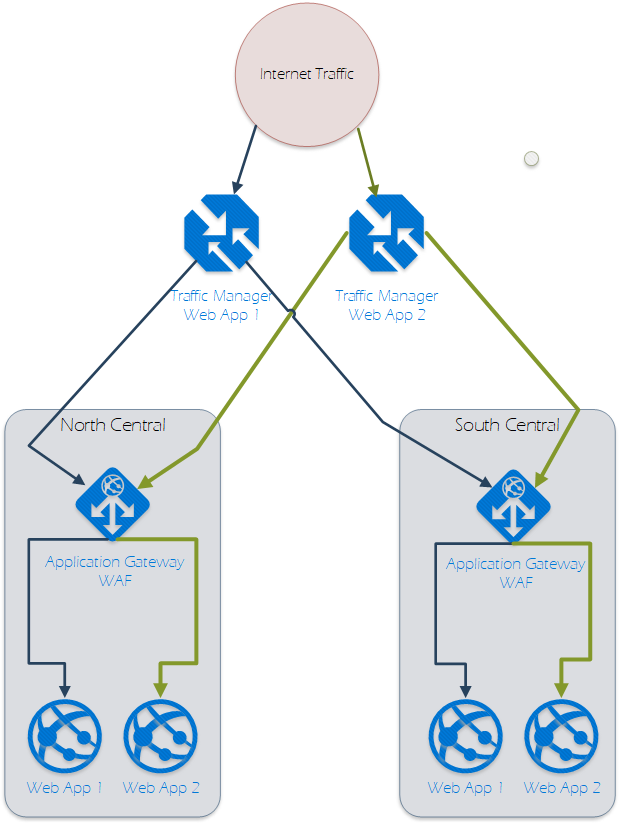 The scenario for this article is that I have two Azure Web App's and I want to place them behind a WAF and only allow access through the WAF, all other traffic should result in a 403 error. In addition I would like to provide georedundancy for these web app's by standing them up in North and South Central and placing them behind a traffic manager.
The scenario for this article is that I have two Azure Web App's and I want to place them behind a WAF and only allow access through the WAF, all other traffic should result in a 403 error. In addition I would like to provide georedundancy for these web app's by standing them up in North and South Central and placing them behind a traffic manager.
Notes
My focus is not to cover every step of the process to create these, but to cover the aspects that are poorly documented or completely undocumented for this use case. I will show how to expose both HTTP and HTTPs, although I would never recommend that, instead expose only HTTPs, and if you must expose HTTP make it redirect to HTTPS. Configuring the Application Gateway I'm going to gloss over a lot of detail for the Application Gateway, since most of it is well documented. You will need to create an Application Gateway in each region and configure it as a WAF, with a Public IP address named WafPublicAddressNorth-ip. You will not need a private IP address.Backend Pools
You will need to create a backend pool for each of your services with a target pointing to the regions web app. For example in North-Waf, create a backend pool called webapp1 and add the target of webapp1-north.azurewebsites.net. You will end up with two backend pools for each Waf. (Total of 4)Health Probes
Edit (5/22): This turns out to be a good start but more work is required to get proves that work and result in automatic failover during outages, Check out Part 2 for more info. You will need to create health probes for each of your service and for each protocol. This means you will end up with 4 health probes for each Waf. (Total of 8) For example in North-Waf create these health probes for handling http and https for webapp1: webapp1-http-probe Host = webapp1-north.azurewebsites.net Protocol = HTTP Path = /status (this is service specific but should lead to some page that gives a 200 when all is well) Everything Else = Defaults webapp1-https-probe Host = webapp1-north.azurewebsites.net Protocol = HTTPS Path = /status (this is service specific but should lead to some page that gives a 200 when all is well) Everything Else = DefaultsHTTP Settings
You will need an HTTP setting for each service and each protocol. This means again you will end up with 4 http settings for each Waf. (Total of 8) For example in North-Waf create these HTTP Settings for handling http and https for webapp1: http-webapp1 Protocol = HTTP Custom Probe = webapp1-http-probe Everything Else = Defaults https-webapp1 Protocol = HTTPS Custom Probe = webapp1-https-probe Backend Authentication Certificate = Upload your CER file that matches the PFX file that goes with your SSL cert Everything Else = DefaultsListeners
You will need a listener for each service and each protocol. This means again you will end up with 4 listeners for each Waf. (Total of 8) For example in North-Waf create these Listeners for handling http and https for webapp1: webapp1-listener-http Protocol = HTTP Host name = webapp1.mydomain.com Frontend Port = 80 Everything Else = Defaults webapp1-listener-https Protocol = HTTPS Host name = webapp1.mydomain.com Frontend Port = 443 Certificate Name = Upload your PFX file that goes with your SSL cert Everything Else = DefaultsRules
You will need a rule for each service and each protocol. This means again you will end up with 4 rules for each Waf. (Total of 8) For example in North-Waf create these rulesfor handling http and https for webapp1: webapp1-rule-http Listener = webapp1-listener-http Backend Pool = webapp1 HTTP Setting = http-webapp1 Type = Basic webapp1-rule-https Listener = webapp1-listener-https Backend Pool = webapp1 HTTP Setting = https-webapp1 Type = Basic This should complete the configuration of your Application Gateway Configuring the Traffic Managers Traffic managers are global so you only are required to create one for each service which points to the WAF in each region. For example for Web App1 create a traffic manager: webapp1.trafficmanager.net Routing Method Geographic Create Endpoint: Webapp1North, Target Resource type: Public IP Address, Target Resource: WafPublicAddressNorth-ip Geo-mapping: whatever setting you want Create Endpoint: Webapp1South, Target Resource type: Public IP Address, Target Resource: WafPublicAddressSouth-ip Geo-mapping: whatever setting you want Configuring the DNS DNS configuration is required to use of an undocumented (as far as I can tell) feature of Web Apps Custom Domain configuration. You will need to create two records for each service one TXT and one CNAME record. They are: webapp1.mydomain.com CNAME webapp1.trafficmanager.net awverify.webapp1.mydomain.com TXT webapp1-north.azurewebsites.net This is the secret sauce that makes this all possible! Configuring the Web Apps The configuration of the web app is fairly simple, after your DNS addresses propogate successfully, go to each webapp and configure the custom domain and SSL cert for each. For example for webapp1:- Add the custom Domain of webapp1.mydomain.com
- Upload your PFX certificate for this domain
- Add a binding of type SNI SSL from that certificate to webapp1.mydomain.com
Originally published March 9, 2018. Preserved from the legacy CameronVetter.com archive.